
Facebook is one of the most common social media platforms that you can use to connect with people around the globe. Not only connecting to your friends and relatives, you can use Facebook for shopping, selling things, entertainment purposes, and many more. You can post your photos on Facebook, so your connections can get updates about you. Recently, many FB users start facing problems while uploading photos on their Facebook accounts.
Sometimes, the image that you upload on your Facebook account gets blurry or changes after upload without any warning. Facebook in general supports images of 720, 960, or 2048 pixels in max. If your image resolution is greater than this, Facebook will automatically trim it as per the upload size requirement. Are you encountering issues with your pictures on Facebook? Don’t worry! We will help you to know how to fix blurry pictures on Facebook. If your photos are appearing as blurry, you can go through the mentioned methods to fix it.
Why Pictures Get Blurry on Facebook?
It is important to find the exact reason for blur images on your Facebook account. Before you learn methods to fix blurry Pictures on Facebook, try to find the exact cause of the issue. Actually, this problem started recently when many people started starts noticing that whatever they upload on Facebook gets blurry, and the picture quality gets distorted.
Let us check some common causes for the blurry pictures on your Facebook account:
- File Type: If the photo you are uploading on Facebook is not in the right format, then it may cause the blurriness of photos while uploading. It is advised to upload photos in JPEG and PNG formats as these formats do not make your image blur.
- Compression: Facebook reduces your image resolution to save server space and reduce loading times. This results in the loss of quality and your image may appear as blurry or distorted.
- Image resolution: As mentioned above, Facebook automatically resizes your image if its resolution exceeds the maximum resolution limit of 2048 pixels. If you upload an image of higher resolution, it may appear blurry or pixelated after upload.
- Slow internet speed: If your device does not have an adequate internet connection at the time of uploading images on Facebook, it results in a blurry or distorted appearance.
- Device-related issues: There may be some problems with the device that you have used to take the photo. If your camera is of poor quality or the lens is dirty, the image may appear blurry even before you upload it to Facebook.
How do I Fix Blurry Photos on Facebook?
To avoid blurry images on Facebook, it is important to upload high-quality images that met Facebook’s recommended resolution and size requirements. Understanding the exact cause of the blurry images on Facebook will help you to easily get the answers for how to fix blurry Facebook pictures. In this section, we will be discussing some commonly used methods that you can try to avoid having blurry Facebook images.
Method 01: Upload High-Quality Images on Facebook
Facebook provides its users to upload high-definition images which prevents them from getting blurred after uploading. This in-built feature of Facebook allows you to generate high-quality images irrespectivegenerate images of high-quality irrespective of the device from which you are uploading images. Go through the following steps to enable HD-quality photos on your mobile device:
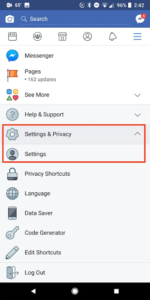
- First, open the Facebook app on your device and click on the three-horizontal lines located in the top-right corner.
- Now, click “Settings and Privacy” and then select “Settings” from the drop-down.
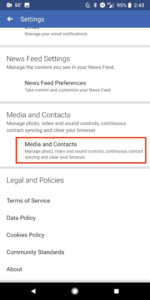
- From the Settings window, click on the ‘Media and Contacts’ option.
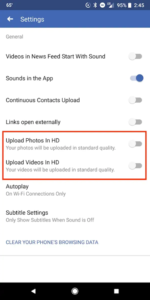
- Another screen with many options will then appear on your device. Toggle the ‘Upload photos in HD’ option to upload HD-quality photos.
Method 02: Reset Your Internet Connection
An improper or unstable internet connection is also the main reason for the bad quality of pictures you upload on Facebook, so check your internet. You need a stable and strong internet connection to make your picture quality better. If your device does not have enough internet bandwidth, avoid uploading pictures on Facebook at that time.
Method 03: Update Facebook App
There may be some error with the Facebook app you are using. It is important to have an updated version of the Facebook app installed on your device. The user experience on Facebook is greatly reduced if you are using an outdated version of the Facebook application. Just go through the following steps to know how to update the Facebook app on your device:
- Open Play Store/App Store/Microsoft Store, depending on the device you are using.
- Search for Facebook and click the Update button, if available.
Wait till the Facebook application gets updated. Once done, open the app and check if your image blurriness is reduced.
Method 04: Fix Facebook Blurry Pictures Using Photo Repair Tool
If the above manual methods fail to repair your FB pictures, and you are still looking to repair photo, use a photo repair tool. Using a photo repair software, like Stellar Repair for Photo is the most simple and straightforward way to fix blurry Facebook images in a few simple steps. The following are the main features of this amazing tool that make it best for your problem of blurry Facebook images:
- Supports repairing damaged photos by fixing all the issues with your images, including blurry photos, grainy photos, dark photos, etc.
- It can repair images of multiple types, including JPG, JPEG, PNG, etc.
- Repair photos stored on any storage drive, including SD cards, phones, cameras, and others.
- The software is compatible with both Windows PC and macOS devices.
- You can use this tool to repair images damaged due to faulty headers, corrupt data, or improper file structure.
Now check the step-by-step instructions to know how to fix blurry pictures on Facebook using this software:
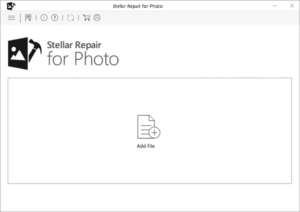
- First, download and install the Stellar Repair for Photo software on your device.
- Launch the software and from the interface that appears, click Add File and upload the image that you want to repair.
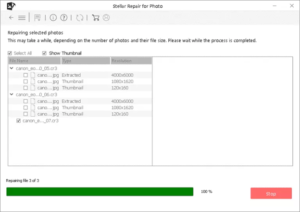
- Once you upload your corrupt or blurry images, click the Repair button to begin the repair process.
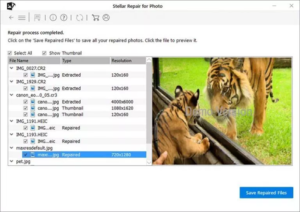
- After that, preview the repaired image files and click the Save Repaired Files button to save the repaired images at the desired location.
Tips to Avoid Facebook Blurry Pictures Issue
Hope the aforementioned methods help you to know how to fix blurry photos on Facebook, now it’s time to learn some measures to avoid such issues from your end. Given below are some tips that you can keep in your mind while uploading pictures on Facebook to avoid blurry pictures issue:
- Always upload pictures according to Facebook standards, i.e., Facebook’s recommended size of 2048 pixels on the longest side. If your image is exceeding the bandwidth, reduce its size before uploading.
- Hold your camera properly and make sure your camera is set to capture images in high resolution.
- A dirt camera lens also results in capturing blurry images, so try to clean your lens on a regular basis using a soft cloth.
- Make sure your device has adequate internet bandwidth as a slow internet connection can also damage or distort your images.
Wrapping Up
This article describes some best possible ways to answer your query on how to fix blurry Facebook pictures. Just go with the above methods to fix your blurry images on Facebook. Also, we have provided a professional image repair tool, i.e., Stellar Repair for Photo, which you can use to repair your damaged images easily. Along with the methods to fix blurry pictures on Facebook, we have provided several tips that you can keep in your mind follow to avoid such issues on your device.